How To Compare Two MeshesAlso, is it just me or do these 'new' vases at t$r have a very similar shape as the older parsimonious pots??!!
Similar shape wouldn't be surprising, vases are vase shaped. However, as you pointed out, this is Shakeshaft. So it may be worth taking a look at these in MilkShape (check the mesh) and LithUnwrap (check the UV map). Here is a quick step by step. You do not need to be a creator or mesher to follow these steps.
1) Download and install
SimPE,
MilkShape, demon's
Extended Manual Edit plugin, and wes_h's
Unimesh plugins for MilkShape.
2) Extract the mesh from the package file. Mesh extraction is covered in the
Unimesh 1 tutorial on MTS2, but here are the steps in brief.
* Open the package file with SimPE.
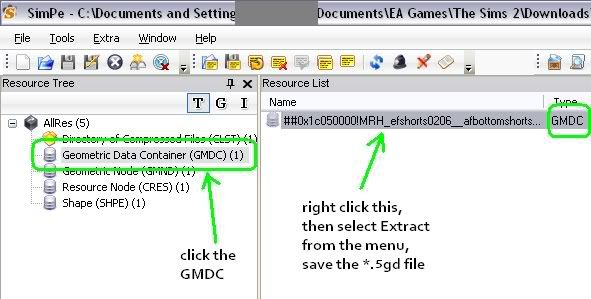
* You will see a list of resources on left. Look for the line with GMDC in it, click it.
* In the middle panel, you will see a GMDC resource line, right click that.
* In the right click menu, select Export and save your mesh as a *.5gd file.
* Exit SimPE.
Now do the same for the 2nd mesh that you want to compare your 1st mesh to.

3) Open the mesh file in MilkShape.
* Run MilkShape.
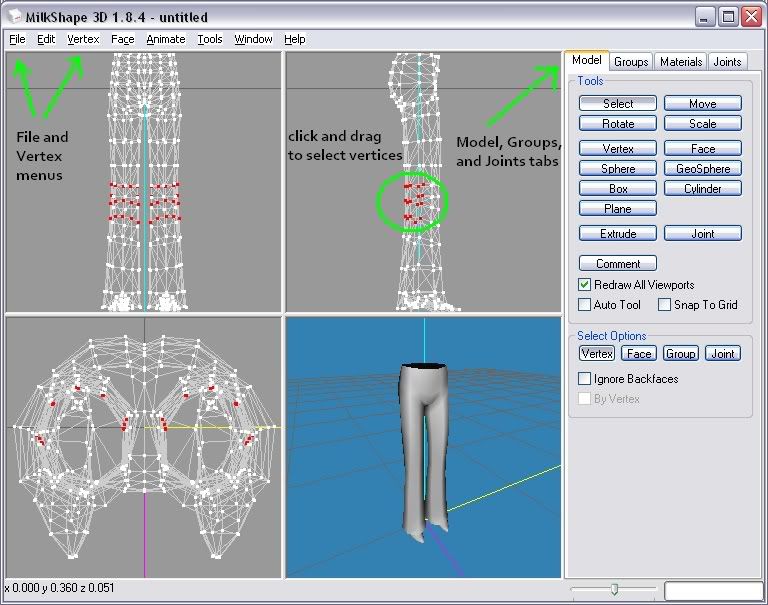
* Before you open any files, click the Groups tab and make sure "autosmooth" is NOT checked.
* Before you open any files, click the Joints tab and make sure "show skeleton" is NOT checked.
* In the File menu, select Import, then select Sims2 Unimesh Import.
* You will now see a mesh. In the blue colored viewport, in the lower right, right click and select "colored groups".
Now that you can see your first mesh, let's import your second mesh so you can compare them.
* File menu, Import again. MilkShape will complain abou importing one model on top of another, don't worry about it, it will be fine, just do it.
Your two meshes will be shown in different colors, since you did "colored groups". You can turn off colored groups if you just want them to be grey. You can also show or hide each mesh individually. Go to the groups tab, select a mesh group, and press the Hide button to hide/show it.

4) Check if one mesh is a copy of the other. Do they look identical?
If so, take screen caps, then double check the numbers with Extended Manual Edit.
You check for identical vertices, normals, and UV coordinates.
If you're not a mesher and don't know what those are, don't worry.
I'll explain briefly, but what matters is that they are numbers and you're checking
to see if they're identical. You do this with demon's Extended Manual Edit plugin.
* In the Model tab, click the Select button.
* In the groups tab, make sure both meshes are visible, use the Hide button to show them both.
* In any of the grey panels with wireframes, hold down the left mouse button and drag to select some vertices (dots).
You will see selected vertices turn from white to red. It may be easiest to select just one pair of vertices, one vertex from each mesh.
* Click the Vertex menu in MilkShape, then select Extended Manual Edit.
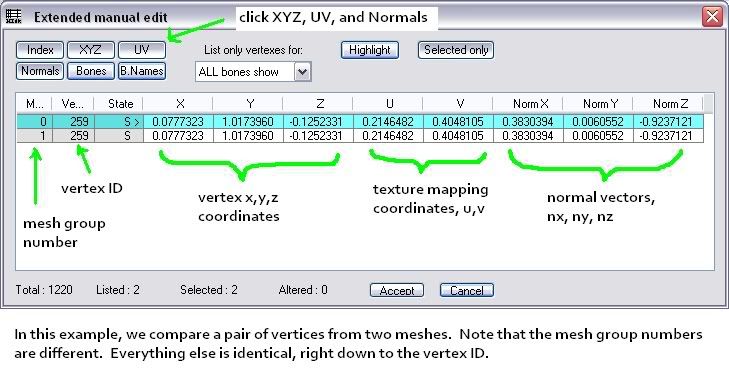
* In the Extended Manual Edit dialog, you will see a some buttons in the top left.
Make sure the ones marked XYZ, Normals, and UV are all clicked down.
If you are looking at a clothes mesh or an object that moves, you may also want to click Bones and Bone Names.
* In the Extended Manual Edit dialog, you will see a bunch of numbers. Check if they're identical for the two meshes.
* Vertices are the "dots" in the wireframe pictures of the mesh. Each vertex has x,y,z coordinates, that's a set of three numbers.
* Think of normals as little pins stuck into the mesh, like a pincushion. They are like arrows that point out from the surface of the mesh. They control how light reflects off the mesh. Each vertex has a normal vector, that's a set of three numbers.
* Each vertex is assigned a location on the texture. This is done with UV coordinates, that's two numbers.
* If the mesh is for clothing or an object that moves, it has a skeleton. Each vertex gets bone weights that control how that vertex moves when the clothing or object animates. Bones and bone weights are a set of up to six numbers.
(This is just an example, I used identical meshes, this is not anyone's stolen mesh.)

5) Compare the UV maps. Do they look the same? If so, take screen caps,
and double check the UV numbers with Extended Manual Edit.
The UV map determines how a texture is "wrapped" onto a mesh. UV maps can be displayed as images and quickly compared that way. There's an
MTS2 tutorial about how to save a UV map image, but here's a quick and simple way to see the UV map in MilkShape.
* In the Groups tab, select the mesh group you want to see the UV map for. Use the Hide button to show the group, then Select to select it, it will turn all red.
* In the Materials group, press the New button, then the topmost <none> button. Select some image file to use as a texture. Click the Assign button.
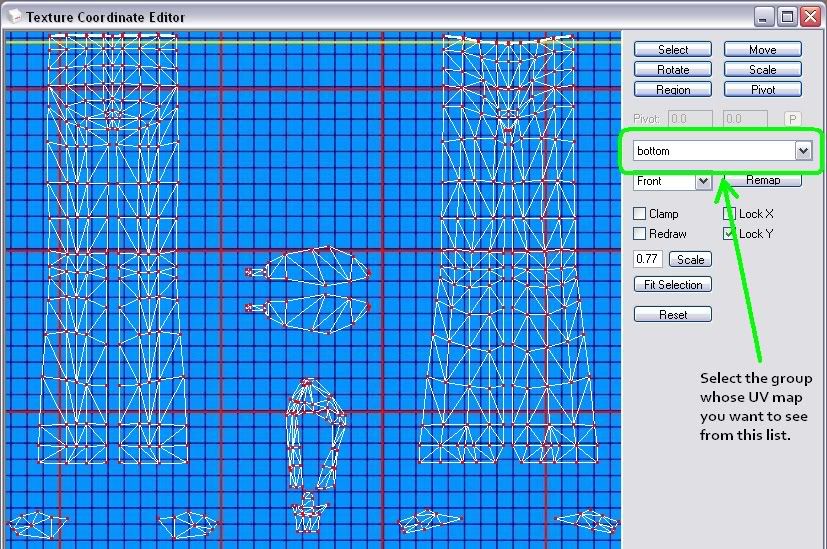
* Now, press CTRL-T to show the UV map editor window.
* In the UV map editor window, there is a dropdown list, select the mesh group you want to see the UV map of.


